It was a long winter. The house and I had grown tense and distant. In the beginning I admired her from afar, longing for us to be back together while replaying the good times in my mind. But it did not last. I became resentful of the cold and our inability to spend time together, so I looked for distractions. Seed catalogs seduced me, and I started a consuming and passionate affair with the garden.
I'm still seeing the garden, but after a long weekend with the house, I think we will be able to work things out. I assured the house that she is my primary partner, and that she was there reason that I even have a garden. I might be falling back in love her.
Sunday, March 28, 2010

Monday, March 8, 2010
Progress!
The snow has finally melted, spring is springing, and progress has been made on the house.
 The yard is in a slightly different configuration since my last post. I took in the laundry that had been on the line through three snow storms, and moved the wood pile. The home/yard owner wants to plant some apple trees in the far right corner of the yard, and the time has come for planting, so the wood had to move. It was a good exercise to get back into the swing of things.
Yesterday was the first day of any real progress. I worked on the foundation and got about 3/4 of the way through the last course of dirt filled sand bags.


Getting them level has been an exercise in patience and dedication. Tamping is one of the less satisfying activities that I've done for the house. Perhaps because the progress is really slow, and hard to see. Also, I'm not in house building shape anymore so it is exhausting.
The plan for today is to finish up the last stretch of the foundation bags and make a decision about my next step. I need to put down a wood frame over the bags. It will be the base for the door and window frames, and also lift the bales up away from the bags which could potentially wick moisture into them. I have a few options for this. The bales are going to be 18 inches wide, and ideally the wood frame would be the same width. The sandbags are about 2 ft wide, maybe more like 28". I have 8 2 x 12s left and I could just lay them out double wide over the bags, or I could cut them in half lengthwise and put them 18" apart and fill in the intermediate space with gravel, or I could see if I have enough other wood scrapes to do that, or I could buy more wood. I don't particularly want to buy anymore wood since I have a big pile of it in the back yard, and putting down the 2x12 double wide would be the least amount of work, so maybe that is the best option. I don't love the idea of adding more foundation that is wider then the bales, but maybe that just needs to be what it is.
 The yard is in a slightly different configuration since my last post. I took in the laundry that had been on the line through three snow storms, and moved the wood pile. The home/yard owner wants to plant some apple trees in the far right corner of the yard, and the time has come for planting, so the wood had to move. It was a good exercise to get back into the swing of things.
Yesterday was the first day of any real progress. I worked on the foundation and got about 3/4 of the way through the last course of dirt filled sand bags.


Getting them level has been an exercise in patience and dedication. Tamping is one of the less satisfying activities that I've done for the house. Perhaps because the progress is really slow, and hard to see. Also, I'm not in house building shape anymore so it is exhausting.
The plan for today is to finish up the last stretch of the foundation bags and make a decision about my next step. I need to put down a wood frame over the bags. It will be the base for the door and window frames, and also lift the bales up away from the bags which could potentially wick moisture into them. I have a few options for this. The bales are going to be 18 inches wide, and ideally the wood frame would be the same width. The sandbags are about 2 ft wide, maybe more like 28". I have 8 2 x 12s left and I could just lay them out double wide over the bags, or I could cut them in half lengthwise and put them 18" apart and fill in the intermediate space with gravel, or I could see if I have enough other wood scrapes to do that, or I could buy more wood. I don't particularly want to buy anymore wood since I have a big pile of it in the back yard, and putting down the 2x12 double wide would be the least amount of work, so maybe that is the best option. I don't love the idea of adding more foundation that is wider then the bales, but maybe that just needs to be what it is.
Saturday, February 6, 2010
Snow days
This is what the house looks like today:

The weather has thwarted any progress. It drains the joy from my heart a little. The house and I had been getting especially closes, spending our days together from early morning until sunset. The end was in sight, I was imagining the bales walls, window boxes with flowers, a double dutch door, and blueberry bushes. My backyard cottage retreat. But now, there is just snow.
Perhaps it is for the best. It looks now like I won't be moving in until the winter is waning, and to be honest I'm glad to not have to deal with freezing temperatures my first nights in the bale house. By next winter I'll have time to properly prepare for the snow and cold, and I imagine it will be a more pleasant experience then moving in right now, were I ready.
For now I have a garden to plan, and maybe if the weather is going to continue being like this I should get my generator stand out of storage and start working on making it work.

The weather has thwarted any progress. It drains the joy from my heart a little. The house and I had been getting especially closes, spending our days together from early morning until sunset. The end was in sight, I was imagining the bales walls, window boxes with flowers, a double dutch door, and blueberry bushes. My backyard cottage retreat. But now, there is just snow.
Perhaps it is for the best. It looks now like I won't be moving in until the winter is waning, and to be honest I'm glad to not have to deal with freezing temperatures my first nights in the bale house. By next winter I'll have time to properly prepare for the snow and cold, and I imagine it will be a more pleasant experience then moving in right now, were I ready.
For now I have a garden to plan, and maybe if the weather is going to continue being like this I should get my generator stand out of storage and start working on making it work.
Thursday, January 14, 2010
Sand bags
Today was a delight of a building day. I got all of ground ready for the first course of the foundation, and when I finished that I discovered that the sandbags had arrived in the mail!
Here is the porch picture. Not a lot of difference.

In finishing the ground prep work I needed to expand the dry well, which looked like this this morning:

I don't know how clear it is between these two pictures, but the diameter of the dry well is about doubled.
 After digging it out I lined it with landscaping fabric

Then filled that with large rocks/concrete chunks, from the sidewalk excavation in the beginning of the summer.

After that, the top was covered with landscaping fabric, and it was covered over with dirt. I also finished leveling the floor of the house and the french drain.

and then I came in and discovered my sand bag delivery and I got started on the very baby begin of getting the sandbag foundation in place.
So the plan is to get two or three courses of sandbags stacked up tamped level, then the bales will go on top of that.
Here is the porch picture. Not a lot of difference.

In finishing the ground prep work I needed to expand the dry well, which looked like this this morning:

I don't know how clear it is between these two pictures, but the diameter of the dry well is about doubled.
 After digging it out I lined it with landscaping fabric
Then filled that with large rocks/concrete chunks, from the sidewalk excavation in the beginning of the summer.

After that, the top was covered with landscaping fabric, and it was covered over with dirt. I also finished leveling the floor of the house and the french drain.

and then I came in and discovered my sand bag delivery and I got started on the very baby begin of getting the sandbag foundation in place.

So the plan is to get two or three courses of sandbags stacked up tamped level, then the bales will go on top of that.
Tuesday, January 12, 2010


Monday, January 11, 2010
Trenches
Good morning, good morning. Yesterday was fairly productive. I got nearly half of the trenching work done. That means that I might be able to finish today. Here are the pictures:
The view from the back porch (this probably looks exactly the same as yesterday, but I want to have this picture everyday)
 Here are the trenches. It is still difficult to understand what is going on. The trench in the foreground is the new one. The old trench runs right through the middle of the house, so I am digging gravel out of the old trench and putting it in the new one, and digging dirt out of the ground to make the new trench, and filling it into the old one.

That might all be easier to understand from this side. This is a picture of the trenches from the other side of the house
 In the picture above, the trench in the middle is the old one that has most of the gravel out and is being filled in with dirt.
The view from the back porch (this probably looks exactly the same as yesterday, but I want to have this picture everyday)
 Here are the trenches. It is still difficult to understand what is going on. The trench in the foreground is the new one. The old trench runs right through the middle of the house, so I am digging gravel out of the old trench and putting it in the new one, and digging dirt out of the ground to make the new trench, and filling it into the old one.
That might all be easier to understand from this side. This is a picture of the trenches from the other side of the house
 In the picture above, the trench in the middle is the old one that has most of the gravel out and is being filled in with dirt.
Sunday, January 10, 2010
Pictures
I am doing a bad job of keeping up with this blog. Since my last post, I've built the roof and shingled it. The plan from here on out is to update daily with pictures. I need some better photo documentation of the house progress, and perhaps I will start actually doing it.
So here is what the house looks like today:
This is the house from the back steps of the main house. here you can see my messy/dangerous work site. Some tidying is in order.

Here is the back side of the house. All of the cross supports are new as of two days ago. those big diagonal pieces are what is allowing the house to stand on its own. Before that there were all kinds of wood bits nailed to stakes in the ground holding everything up.

Here is a shot of the state of the foundation trench. This picture is a little confusing, but the trenches are a hot mess right now. This is the job for today. Getting them in the right place, and then moving the gravel.
Here are another two view of the trenches.


Here is the roof, complete with sealed skylights and shingles.

So that is it. I'm hoping to make some good progress in the trenches today. Winter digging has a different set of challenges then summer digging. Getting over heated is not a problem. But the first foot or so of dirt is frozen. Good thing I figured out the pick axe --> shovel method in the summer.
So here is what the house looks like today:
This is the house from the back steps of the main house. here you can see my messy/dangerous work site. Some tidying is in order.

Here is the back side of the house. All of the cross supports are new as of two days ago. those big diagonal pieces are what is allowing the house to stand on its own. Before that there were all kinds of wood bits nailed to stakes in the ground holding everything up.

Here is a shot of the state of the foundation trench. This picture is a little confusing, but the trenches are a hot mess right now. This is the job for today. Getting them in the right place, and then moving the gravel.

Here are another two view of the trenches.


Here is the roof, complete with sealed skylights and shingles.

So that is it. I'm hoping to make some good progress in the trenches today. Winter digging has a different set of challenges then summer digging. Getting over heated is not a problem. But the first foot or so of dirt is frozen. Good thing I figured out the pick axe --> shovel method in the summer.
Tuesday, December 8, 2009
side track
My plans changed a little since my last post. I was convinced not to notch all of the joist, but to just use the hurricane ties. I may have explained this before, but hurricane ties are little metal pieces that look like this : 
They are used in deck and roof construction. I believe the name comes from their use in deck construction, in that case they are holding the cross supports down and in place in the case of strong upward/lateral winds.

I have not actually put up my joists though and they are not the subject of this post. The real subject is a pedal powered generator.
 I realized last week that I am about to graduate from school, which means I am about to stop having access to the metal shop. I had thought about that before, but didn't think it was a big deal because I've been exclusively using hand tools in my back yard for the last few months. Then I remembered that I want to have a pedal powered generator for my house, and if I don't make it now, I will have to make it using hand tools in my back yard. That prospect was not appealing, so I put the house on hold and got to work.
A pedal power generator is a surprisingly simple thing. At least, to make it generate power. I have not yet hooked this thing up to charge a battery, which is what it will do eventually, and that I imagine is the more complicated part, I need to do more research because I am fuzzy on the details.
Anyway, a motor and a generator are the same thing. If you input electricity you have a motor, with a rotational output, and if you input the rotation you have a generator, with an electrical output. I am simplifying a lot, and possibly being a little bit liberal with my language, but if you have a motor and you hook it up to a voltmeter and turn the output shaft you will see that volts are happening.
For my generator I ordered an electric scooter motor off of ebay. It looks a lot like this:
 Then I spent a while trying to decide what variety of pedaling device I wanted. There are about half a million plans on the internet, each with their own advantages. I decided to go with what seems like the simplest. The simplest plan (in my mind) is having a bike trainer stand that holds up a regular bike, and the tire rests on the output shaft of the motor and turns it.
The first step was building the bike stand:


The bike is held up by the nuts that hold the tire on. The pipe on the right is adjustable, the bike is put in place then the pipe is slid over and locked in, and the tire rests on the output shaft of the motor.
 I hooked the motor up to a multimeter and give it a test ride. I got up to about 80 volts. To be honest I'm not sure what that will mean in terms of charging the battery, but I'll update as I know. For now I think I have a good starting point for my generator.
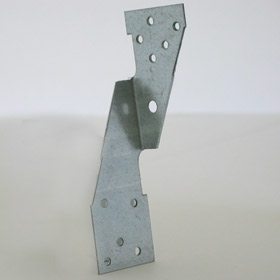
They are used in deck and roof construction. I believe the name comes from their use in deck construction, in that case they are holding the cross supports down and in place in the case of strong upward/lateral winds.

I have not actually put up my joists though and they are not the subject of this post. The real subject is a pedal powered generator.
 I realized last week that I am about to graduate from school, which means I am about to stop having access to the metal shop. I had thought about that before, but didn't think it was a big deal because I've been exclusively using hand tools in my back yard for the last few months. Then I remembered that I want to have a pedal powered generator for my house, and if I don't make it now, I will have to make it using hand tools in my back yard. That prospect was not appealing, so I put the house on hold and got to work.
A pedal power generator is a surprisingly simple thing. At least, to make it generate power. I have not yet hooked this thing up to charge a battery, which is what it will do eventually, and that I imagine is the more complicated part, I need to do more research because I am fuzzy on the details.
Anyway, a motor and a generator are the same thing. If you input electricity you have a motor, with a rotational output, and if you input the rotation you have a generator, with an electrical output. I am simplifying a lot, and possibly being a little bit liberal with my language, but if you have a motor and you hook it up to a voltmeter and turn the output shaft you will see that volts are happening.
For my generator I ordered an electric scooter motor off of ebay. It looks a lot like this:
 Then I spent a while trying to decide what variety of pedaling device I wanted. There are about half a million plans on the internet, each with their own advantages. I decided to go with what seems like the simplest. The simplest plan (in my mind) is having a bike trainer stand that holds up a regular bike, and the tire rests on the output shaft of the motor and turns it.
The first step was building the bike stand:


The bike is held up by the nuts that hold the tire on. The pipe on the right is adjustable, the bike is put in place then the pipe is slid over and locked in, and the tire rests on the output shaft of the motor.
 I hooked the motor up to a multimeter and give it a test ride. I got up to about 80 volts. To be honest I'm not sure what that will mean in terms of charging the battery, but I'll update as I know. For now I think I have a good starting point for my generator.
Saturday, November 21, 2009
Long Due Update
Since the decision not to used power tools I have not felt inclined to update the blog, perhaps because the pace slowed down to a near crawl.
Though it has been slow, a lot has happened. I got four 6" x 6" cross supports up, and today I cut all of the floor boards for the loft. They are in place, but they have not been secured yet. Some of the wood had mold growing on it from being under the tarp for so long cleaned it with a bleach solution and it needs to dry out completely before I can seal it. I'll seal it up there, but I want to be able to move the wood around and flip it over (which is why it isn't nailed or pegged in place)

Today I also hauled a full length 2" by 12" up on that platform and set it on the big beams to mark the notches that will go in each of my joists. I got that one, which is my template, cut and another joist marked before it got dark. I think that if I really work hard tomorrow I could get all of the notches done. I'll need 17 of them.
Though it has been slow, a lot has happened. I got four 6" x 6" cross supports up, and today I cut all of the floor boards for the loft. They are in place, but they have not been secured yet. Some of the wood had mold growing on it from being under the tarp for so long cleaned it with a bleach solution and it needs to dry out completely before I can seal it. I'll seal it up there, but I want to be able to move the wood around and flip it over (which is why it isn't nailed or pegged in place)

Today I also hauled a full length 2" by 12" up on that platform and set it on the big beams to mark the notches that will go in each of my joists. I got that one, which is my template, cut and another joist marked before it got dark. I think that if I really work hard tomorrow I could get all of the notches done. I'll need 17 of them.
Wednesday, October 7, 2009
I decided a few days ago that I am done using power tools. I was thinking at first that I would only not use power tools for the house, but actually I am just not going to use them at until the house is done.
I think that it is going to be good. if you want to know more about what lead me to that decision look at my other blog, here
This blog has been detailing the physical progress of the project, and the other is some of the accompanying thoughts and things.
I think that it is going to be good. if you want to know more about what lead me to that decision look at my other blog, here
This blog has been detailing the physical progress of the project, and the other is some of the accompanying thoughts and things.
Monday, October 5, 2009
house raising/beam falling
Yesterday was another wonderfully successful build day. We took all of the beams down, cut two of them, turned them around, and put them back up.
When I was planning the day I thought that the safest way to get the beams down would be to use the lift to slowly lower them, but I was a little worried about it. The reason that raising the beams with the lift was safe was because the winch could lean against the post that the beam was going to be resting on.
Until the beam was actually up on the posts there was no real danger, we just had to keep pressure on the lift so that it would not lean back. It could not fall forward because the beam was stopping it. The dangerous part of the lifting was when we got the beam up to the top and we lifted each side onto the posts. At that point the lift could have pushed on the beam and made it fall of the other side, we had to be very careful about keeping it upright.
When I was planning the day I thought that the safest way to get the beams down would be to use the lift to slowly lower them, but I was a little worried about it. The reason that raising the beams with the lift was safe was because the winch could lean against the post that the beam was going to be resting on.

Until the beam was actually up on the posts there was no real danger, we just had to keep pressure on the lift so that it would not lean back. It could not fall forward because the beam was stopping it. The dangerous part of the lifting was when we got the beam up to the top and we lifted each side onto the posts. At that point the lift could have pushed on the beam and made it fall of the other side, we had to be very careful about keeping it upright.
Lowering the beam that way was seemed a lot more dangerous because the lift started off unsupported

(sorry this one is facing the wrong way...technical issues)
So the lift and beam in this position both want to move toward each other. The beam wants to swing back into the lift and the lift wants to lean over. When I planned to do it this in this way I thought we would just have to brace the lift to the post and hope for the best.
I was still worried about it during the build day and I was talking with my friend Daniel, and he thought we should just go ahead and pull the beam down. We thought about it, and decided that even if it made the whole house fall down we could position our selves outside the danger zone and that it would definitely be easier, and probably safer too. So we took all of the brackets off of the first beam (that was an ordeal), then we tied some rope to the beam, got up on the neighbor's shed and gave it a tug.


The falling beam was shockingly anticlimactic. It gently rolled off the posts and hit the ground with hardly a thud. After the first one was so easy we decided it was safe to pull the rest down even though we would have to stand on the ground and be closer to the action. They came down without an issue.
Once we had the beams on the ground we cut five feet off of them, then hoisted them back up on the posts with the overhang facing the house.
I was proud of the team. There were just six of us for most of the time and we got everything done in about four hours.
I was still worried about it during the build day and I was talking with my friend Daniel, and he thought we should just go ahead and pull the beam down. We thought about it, and decided that even if it made the whole house fall down we could position our selves outside the danger zone and that it would definitely be easier, and probably safer too. So we took all of the brackets off of the first beam (that was an ordeal), then we tied some rope to the beam, got up on the neighbor's shed and gave it a tug.
The falling beam was shockingly anticlimactic. It gently rolled off the posts and hit the ground with hardly a thud. After the first one was so easy we decided it was safe to pull the rest down even though we would have to stand on the ground and be closer to the action. They came down without an issue.
Once we had the beams on the ground we cut five feet off of them, then hoisted them back up on the posts with the overhang facing the house.
I was proud of the team. There were just six of us for most of the time and we got everything done in about four hours.
Tuesday, September 29, 2009
The plan
I went out back today and looked down the alley and saw that as it appeared in the picture I saw in the zoning office, all of the nieghbors' fences and the immediate neighbor's shed are in a nice line. I didn't bother measuring from the front of the house, I think it is safe to assume that that is the property line. Unfortunately that line is about 2 1/2 feet closer in then I thought. Fortunately, my new back posts (the old middle ones), are about six and a half feet from that line. That means that I cannot do what I originally planned and put all of the posts inside of the wall, but it is also not a huge problem. Here is an arial view with just the walls and posts:
 My front two posts will exist inside of the bale wall and the back two will exist outside of it. That is not my ideal situation, because now my cross supports will intersect the bale wall, but I think that is going to be fine.
My next two steps are fairly straight forward. First I need to move my trench, and by move I mean I need to dig a new trench, shovel all of the gravel out of the old trench, then fill the new trench with gravel and the old trench with dirt. Then I need to take down the left most set of posts and the beam. Then for the other two beams, I need to take them down, cut off about five feet, flip them the other way and put them back up. Since I am not centering the beam on the posts I don't need to cut new notches. I just need to have the over hang on the other side. Carlton also recommended getting more substantial brace plates for the beam. The ones I have area a little dinky.
Once the beams are in their new position it it time for the cross bracing. I was thinking that I wanted to do this timber frame style with notches and things because it is really beautiful and also strong, but I think that it might be more work then it is worth. Actually I am not convinced that I think that. I am going to do some research on timber frame construction tomorrow and see what I find out. If I do it that way I think that the bracing will need to be done before the top beam is put back on. I cannot imagine how I would get the braces in place without the posts having some wiggle room.
Either way, my plan is to have another work party this weekend to move some beams and possibly notch some posts. I have some prep work to do before then, both with the trench and with planning.
Also, with my new plan I am actually under the 150 sq ft that allows me to build without a permit. That is exciting.
 My front two posts will exist inside of the bale wall and the back two will exist outside of it. That is not my ideal situation, because now my cross supports will intersect the bale wall, but I think that is going to be fine.
My next two steps are fairly straight forward. First I need to move my trench, and by move I mean I need to dig a new trench, shovel all of the gravel out of the old trench, then fill the new trench with gravel and the old trench with dirt. Then I need to take down the left most set of posts and the beam. Then for the other two beams, I need to take them down, cut off about five feet, flip them the other way and put them back up. Since I am not centering the beam on the posts I don't need to cut new notches. I just need to have the over hang on the other side. Carlton also recommended getting more substantial brace plates for the beam. The ones I have area a little dinky.
Once the beams are in their new position it it time for the cross bracing. I was thinking that I wanted to do this timber frame style with notches and things because it is really beautiful and also strong, but I think that it might be more work then it is worth. Actually I am not convinced that I think that. I am going to do some research on timber frame construction tomorrow and see what I find out. If I do it that way I think that the bracing will need to be done before the top beam is put back on. I cannot imagine how I would get the braces in place without the posts having some wiggle room.
Either way, my plan is to have another work party this weekend to move some beams and possibly notch some posts. I have some prep work to do before then, both with the trench and with planning.
Also, with my new plan I am actually under the 150 sq ft that allows me to build without a permit. That is exciting.
Monday, September 28, 2009
Information update
After my first bout of information gathering, I was moving forward, but got to a point that I didn't totally know what to do next. I had the verbal description of the property, but no way to translate that into a real world physical description of the property. I studied the strange document I was given at the court house, and then showed it to Carlton. He explained to me that even if I were to pay for a survey (they are very expensive) I would not have a legally recognized property line. To have a legal property line I would have to take that survey to the city, then the city would get the survey approved by my neighbors, and then it would be a legal document. For that reason he recommended that I go down to the zoning office, show them what I have and tell them what I want to do and then see what happens. So I did that.
I put myself in the zoning office with the deed paper and I explained to the man behind the counter that I want to build a shed and that I want to place it in the yard legally. I told him that I was told that i needed a five foot set back on all sides, and that I didn't know how to figure out where the property line in the back is. He said that there is not a way to be one hundred percent sure with out a survey, but he said that he would do a little bit of research, and see if we could get a reasonable idea of where the property line is. He pulled up the information for my address and it said that the plot was 125 ft deep, there was no more or less. That made me feel better. He also pulled up a map of my street and all of the properties are exactly the same depth. One of the maps we looked at had an aerial view of the street with green property lines over top. In that view the the property line ran exactly over top of the back fence of all of my neighbors, and was even with the back wall of my immediate neighbor's shed. That is a good reference point. What the zoning guy recommended that I do is to mark where the fence line is, then measure back from the front fence 125 ft and see if these are the same. Assuming that they are, or that they are pretty close, then he recommended that I build six feet back from that line and not hire a surveyor.
I think that sounds like a good plan. I am worried that my middle post that I want to become the back post is still too close to the line. I am just going to keep my fingers crossed until I get home and can do some measurements.
I nearly forgot, the zoning man also told me that I only need a 3ft setback from the side and that my shed can be up to 20ft tall.
I put myself in the zoning office with the deed paper and I explained to the man behind the counter that I want to build a shed and that I want to place it in the yard legally. I told him that I was told that i needed a five foot set back on all sides, and that I didn't know how to figure out where the property line in the back is. He said that there is not a way to be one hundred percent sure with out a survey, but he said that he would do a little bit of research, and see if we could get a reasonable idea of where the property line is. He pulled up the information for my address and it said that the plot was 125 ft deep, there was no more or less. That made me feel better. He also pulled up a map of my street and all of the properties are exactly the same depth. One of the maps we looked at had an aerial view of the street with green property lines over top. In that view the the property line ran exactly over top of the back fence of all of my neighbors, and was even with the back wall of my immediate neighbor's shed. That is a good reference point. What the zoning guy recommended that I do is to mark where the fence line is, then measure back from the front fence 125 ft and see if these are the same. Assuming that they are, or that they are pretty close, then he recommended that I build six feet back from that line and not hire a surveyor.
I think that sounds like a good plan. I am worried that my middle post that I want to become the back post is still too close to the line. I am just going to keep my fingers crossed until I get home and can do some measurements.
I nearly forgot, the zoning man also told me that I only need a 3ft setback from the side and that my shed can be up to 20ft tall.
Information Adventures
This morning I began my search for the plot survey of the yard where I am building. I thought that it would be a pretty simple process, but I seem to have begun a big mission. I went down to the John C Marshal courthouse, found my way into the records office and asked if they had a survey for my house. The woman behind the counter typed the address into her computer and pulled up the deed for the house, then flipped through the PDF and made a sort of disappointed noise. She pointed to the screen and said that if a survey had happened that it should have been referenced there. Then she said she could check one more place and she pulled up another deed for the property and it was basically the same screen. I peeked at her computer to try and understand what she was looking at, and she told me that I could have a print out of that digital paper, and that I would need to hire a surveyor for the property.
The print out she gave me is fascinating:
 I am pretty sure that this is the legal document describing what land is owned and by whom, and it is so fuzzy. The depth of the plot is "125 ft, more or less". I had no idea that deeds were such silly documents, this one is so vague.
While I appreciate this strange discovery, it is a bit of a problem for me. Unless a survey happened prior to this document, I think I need to hire a surveyor to come out and declare where exactly the property line is. That is another interesting thing. This legal document's soft description of the property line maybe the only description of the property line that exists, and that can only be turned into a hard line by a surveyor.
The print out she gave me is fascinating:
 I am pretty sure that this is the legal document describing what land is owned and by whom, and it is so fuzzy. The depth of the plot is "125 ft, more or less". I had no idea that deeds were such silly documents, this one is so vague.
While I appreciate this strange discovery, it is a bit of a problem for me. Unless a survey happened prior to this document, I think I need to hire a surveyor to come out and declare where exactly the property line is. That is another interesting thing. This legal document's soft description of the property line maybe the only description of the property line that exists, and that can only be turned into a hard line by a surveyor.
Sunday, September 27, 2009
Headed in the right direction
After months of bumbling about, and doing things the dumbest way possible, I think I am starting in a direct path toward the finish. This project has been marked by me doing incompletely research and not fully understanding what I am doing, but moving forward as best I can, both hoping that everything will work, and expecting for a lot of it to fail.
Today two of my instructors, Liz and Carlton, along with a friend of theirs came over for what was planned as a work day, but ended up being a consultation. Carlton has a lot of experience both building houses and dealing with bueracracy related to building structures, and he gave me an outline of an action plan.
Firstly, I need to really be sure that I am inside of the property by five feet. To do that I need to know exactly where the property line is. To find that out I need a survey. This information may be easy to obtain. Surveys should be on file at the courthouse downtown, so tomorrow I will head down there and see if I can talk the people working there into helping me find the survey of the property where I am building. If this information is not there I am in some trouble. Not big trouble, but I will need to hire someone to survey the property and tell me where the line is, or move the structure to the middle of the yard, or just build it and hope for the best. Seeing where that has put me before, I think my best plan is to find out exactly where the line is.
Once I have the exact location of the line, I can figure out what kind of situation I am in. I feel pretty confident that the side yard fence is on or within a foot of the property line there, but the back of the yard is a mystery. The fence sticks out further then all of the other fences on our street by about two feet, so the property line might be two feet closer then I thought. I don't even have a good guess. When I know, I will be able to evaluate my remodel plan.
Here is how the building looks right now:
 If you where looking from above it would look like this:

I plan to keep the four innermost posts where they are, and move their beams forward, centering them over those four posts:
 So I will be ditching the left beam, and the five outside posts. Once I have done that, I will put up the joists and the rest of the roofing as I had planned before:
 My big concern here is the distance from my back overhang to the property line. When I know where the property line is I am going to have to figure out if my overhang crosses the five foot rule, and then go down to the permit office and ask if that is a violation or not.
My other concern is about the amount of cantilever of the beams and joists and if that is going to be ok. I talked to Carlton about that and he said that he has some books detailing the method of doing those calculations, so I am going to sit down with him this week and see if we cannot work it out.
Carlton also told me that my building is going to need some cross bracing, so I am going to do some research on timber frame construction and come up with some good drawings of my frame with proper support.
I am feeling very good about this. I think I am finally going about things in the right order and maybe the physical progress that is made from here on out will actually be progress instead of work that has to be redone.
Today two of my instructors, Liz and Carlton, along with a friend of theirs came over for what was planned as a work day, but ended up being a consultation. Carlton has a lot of experience both building houses and dealing with bueracracy related to building structures, and he gave me an outline of an action plan.
Firstly, I need to really be sure that I am inside of the property by five feet. To do that I need to know exactly where the property line is. To find that out I need a survey. This information may be easy to obtain. Surveys should be on file at the courthouse downtown, so tomorrow I will head down there and see if I can talk the people working there into helping me find the survey of the property where I am building. If this information is not there I am in some trouble. Not big trouble, but I will need to hire someone to survey the property and tell me where the line is, or move the structure to the middle of the yard, or just build it and hope for the best. Seeing where that has put me before, I think my best plan is to find out exactly where the line is.
Once I have the exact location of the line, I can figure out what kind of situation I am in. I feel pretty confident that the side yard fence is on or within a foot of the property line there, but the back of the yard is a mystery. The fence sticks out further then all of the other fences on our street by about two feet, so the property line might be two feet closer then I thought. I don't even have a good guess. When I know, I will be able to evaluate my remodel plan.
Here is how the building looks right now:
 If you where looking from above it would look like this:
I plan to keep the four innermost posts where they are, and move their beams forward, centering them over those four posts:
 So I will be ditching the left beam, and the five outside posts. Once I have done that, I will put up the joists and the rest of the roofing as I had planned before:
 My big concern here is the distance from my back overhang to the property line. When I know where the property line is I am going to have to figure out if my overhang crosses the five foot rule, and then go down to the permit office and ask if that is a violation or not.
My other concern is about the amount of cantilever of the beams and joists and if that is going to be ok. I talked to Carlton about that and he said that he has some books detailing the method of doing those calculations, so I am going to sit down with him this week and see if we cannot work it out.
Carlton also told me that my building is going to need some cross bracing, so I am going to do some research on timber frame construction and come up with some good drawings of my frame with proper support.
I am feeling very good about this. I think I am finally going about things in the right order and maybe the physical progress that is made from here on out will actually be progress instead of work that has to be redone.
Monday, September 21, 2009
Zoning
If you are thinking about building a shed, or any building, you should check out zoning laws. Even if you think you don't need a building permit, you should look at zoning laws and find out where you are allowed to build. In my neighborhood you cannot put any structure within 5 ft of your property line.
Last Thursday my roommate called me and said, There are a bunch of building inspector men in the back yard, and I don't know what to tell them. I called her back and she explained that the inspectors came by and gave a work stop order and left a number where I could call. I called them the next morning and the man was incredibly nice. He explained that my structure was in fact too big to build with out a permit, and that I would need to come down town and get one. He also said that I was doing a good job building and that everything he saw looked great. I was happy to hear that, but then he said that I was probably too close to the property and that when I went down town they would tell me the zoning laws.
So I went down town, and had another really good encounter. The building permit man explained everything I would need and gave me the application. He told me that since I am only building a shed that all I need to do is have some drawings that show the size of the building and the size of all the materials and fill out the application. That was great, and then he checked on the zoning laws, and told me about the 5 ft rule.
Right now my posts are pretty much on the property line, which means I have a couple of options. I can take everything down, dig the concrete piers out of the ground, find a way to get them out of the hole, dig new holes and move them in, then re-erect the structure. I could try and brace the structure to itself and move it as a single unit, and do the same thing with the piers. I could also re-design the building to try and use as much of the existing structure as possible.
I have elected to redesign. For one thing, the owner of the house where I am building does not want this shed right in the middle of his yard. He has quietly expressed concern about it encroaching on the rest of his space. For another thing it will be an amazing amount of work to move everything. Moving the wood would definitely be a big job considering the work it took to get it up, but moving the concrete is the part that I think would be truly miserable. Each pier weighs at least 200lbs and getting that big heavy cylinder out of one hole and into another is a feat of engineering that I am not willing to undertake. Out of everything I am probably most upset about the wasted concrete. It is a terribly energy intensive (fossil fuel energy, not mine) material, and I have wasted a lot of it. In the redesigned shed I intend to use four of the nine posts and piers. That means that I have wasted 5 of them, which is at least 1000 lbs of concrete. That is pretty bad. I feel fairly guilty. The extra wood is not a worry. I'll use that for something else, and it was already saved from a mulch destiny.
Last Thursday my roommate called me and said, There are a bunch of building inspector men in the back yard, and I don't know what to tell them. I called her back and she explained that the inspectors came by and gave a work stop order and left a number where I could call. I called them the next morning and the man was incredibly nice. He explained that my structure was in fact too big to build with out a permit, and that I would need to come down town and get one. He also said that I was doing a good job building and that everything he saw looked great. I was happy to hear that, but then he said that I was probably too close to the property and that when I went down town they would tell me the zoning laws.
So I went down town, and had another really good encounter. The building permit man explained everything I would need and gave me the application. He told me that since I am only building a shed that all I need to do is have some drawings that show the size of the building and the size of all the materials and fill out the application. That was great, and then he checked on the zoning laws, and told me about the 5 ft rule.
Right now my posts are pretty much on the property line, which means I have a couple of options. I can take everything down, dig the concrete piers out of the ground, find a way to get them out of the hole, dig new holes and move them in, then re-erect the structure. I could try and brace the structure to itself and move it as a single unit, and do the same thing with the piers. I could also re-design the building to try and use as much of the existing structure as possible.
I have elected to redesign. For one thing, the owner of the house where I am building does not want this shed right in the middle of his yard. He has quietly expressed concern about it encroaching on the rest of his space. For another thing it will be an amazing amount of work to move everything. Moving the wood would definitely be a big job considering the work it took to get it up, but moving the concrete is the part that I think would be truly miserable. Each pier weighs at least 200lbs and getting that big heavy cylinder out of one hole and into another is a feat of engineering that I am not willing to undertake. Out of everything I am probably most upset about the wasted concrete. It is a terribly energy intensive (fossil fuel energy, not mine) material, and I have wasted a lot of it. In the redesigned shed I intend to use four of the nine posts and piers. That means that I have wasted 5 of them, which is at least 1000 lbs of concrete. That is pretty bad. I feel fairly guilty. The extra wood is not a worry. I'll use that for something else, and it was already saved from a mulch destiny.
Wednesday, September 16, 2009
Great Success
This past weekend was the house raising take two, and it was wildly successful. I owe this in no small part to the contributions of a very talented and generous man named Blake Huff. I believe that it might have been near disaster take two had he not been there.
By the end of the day we had up the main support for the roof which consists of nine posts, and three stupidly huge beams.

Erecting this monster was no simple task. After the failures of the last attempt I was very concerned with doing this safely. I spoke with many of my friends and colleagues and we decided that the first attempt was not totally misguided, we just went about it the wrong way. Here is what we did the first time:
 We put the beam up on the three posts then started pushing it up while walking up the legs. At about the point illustrated in the diagram the weight of the beam end was much heavier then the other side of the post so it started to tip back behind us. As you may know everyone baled at this moment and the whole thing came crashing to the ground.
The revised version is actually quite similar except that we use physics to our advantage: In this plan we are pushing on the beam itself so there isn't a big cantilevered weight, and we have ropes pulling from the other side. The pushing for the beam is done with what are essentially notched battering rams. In this plan even if it does crash no one is in the danger zone. At least, no one is directly under the beam like last time.
This was my plan until the day before the house raising when my dad emailed me with this wonderful invention that he found on the internet. I don't know if I am allowed to publish this image because it is from someone's patent, but all of the patent information is on the page and the whole thing can be found here
So this patented device is a wall lift.
It is like a little elevator with a pivot at the bottom. It starts with the elevator down and the wall lying on the ground. On side of the wall is resting on the lip of the elevator car Then the elevator starts raising and the elevator shaft starts to tilt forward, as shown in the image bellow.
  Eventually the elevator reaches the top at which point the wall is vertical and the elevator shaft is leaning over supporting the wall like a brace.
To me this seemed like a wonderful invention that would save a lot of potential heartache and injury, so after receiving the plan, I went about making a quick and dirty version of this device.
I got some 16ft 2x6's and chopped up some scrape 2x4s from the wood shop at school to make the elevator shaft, then I secured some pulleys to a steel plate on the top. Then I realized that I needed some kind of guide to keep the elevator car from popping out of the front, so I ripped some more scrap wood into 1" strips and screwed them onto the front. Then I went about making the elevator "car" out of scrap wood and scrap steel. I worked until about three in the morning on this thing. Then I got up at six in the morning to finish it. By the time I left to meet everyone to raise the roof, I had a functioning lift, but no base for it. I figured that I could enlist some help and finish it on site.
As it turned out, the amount I finished was exactly what we needed. I mentioned earlier that Blake saved the day. I explained the lifting contraption to him, then showed him what I had built, he laughed and said "that thing is as over built as these beams". He meant, I assume, that as with the roof, I made it far beefier then it needed to be. After a few minutes of thinking he told me that he thought it would be easier and safer to put the posts up first, then set my winching mechanism up right and raise the beam. I told him that I trusted his judgment far more then my own.
So we started.
 Blake taught us how to get the posts in place and secured with braces.

Then he instructed us to lift the first beam onto some scrap 6x6's which were both about four feet tall. This was to take some of the work off of the lift.
 Once the beam was secured in place we went about setting up the lift.
 We got the lift into position, then tried to lift the beam with the "elevator car" that I had built. That did not work because it got bound up in the shaft, so we tossed aside my sleepless night and more intelligently tied the ropes directly to the beam.
 To my shock, it worked. The ropes that tied to the beam were looped over pulleys at the top of the lift, then tied on the other end to a cable winch. A ratcheting device that looked a lot like this:
I was able to just crank on the winch, and the beam went up in the air. It was kind of magical.
After we got the beam in the air, Blake and my father got up on ladders and shimmied the beam into place, then nailed it down with some gusset plates.

We used the same method for the rest of the posts and beams with great success until the very end. All of the beams are notches to fit over the posts and these notches are of varying depth due to the fact that the concrete piers are not level. For the first two beams the notches were at exactly the right depth for each post, but on the last one, the end post was a little short. The beam was floating about two inches above the post.
Blake looked at that, then said "get a rope". We were then instructed to hang on the rope to pull the end of the beam down, while blake draped himself over the top of it and my friend Micheal nailed it into place.
 It was a spectacle, but it worked. All of the posts and beams are in place. Now I just need to organize another little party to get the joists in the air.
By the end of the day we had up the main support for the roof which consists of nine posts, and three stupidly huge beams.

Erecting this monster was no simple task. After the failures of the last attempt I was very concerned with doing this safely. I spoke with many of my friends and colleagues and we decided that the first attempt was not totally misguided, we just went about it the wrong way. Here is what we did the first time:
 We put the beam up on the three posts then started pushing it up while walking up the legs. At about the point illustrated in the diagram the weight of the beam end was much heavier then the other side of the post so it started to tip back behind us. As you may know everyone baled at this moment and the whole thing came crashing to the ground.
The revised version is actually quite similar except that we use physics to our advantage:
 In this plan we are pushing on the beam itself so there isn't a big cantilevered weight, and we have ropes pulling from the other side. The pushing for the beam is done with what are essentially notched battering rams. In this plan even if it does crash no one is in the danger zone. At least, no one is directly under the beam like last time.
This was my plan until the day before the house raising when my dad emailed me with this wonderful invention that he found on the internet. I don't know if I am allowed to publish this image because it is from someone's patent, but all of the patent information is on the page and the whole thing can be found here
So this patented device is a wall lift.

It is like a little elevator with a pivot at the bottom. It starts with the elevator down and the wall lying on the ground. On side of the wall is resting on the lip of the elevator car
 Then the elevator starts raising and the elevator shaft starts to tilt forward, as shown in the image bellow. Eventually the elevator reaches the top at which point the wall is vertical and the elevator shaft is leaning over supporting the wall like a brace.
To me this seemed like a wonderful invention that would save a lot of potential heartache and injury, so after receiving the plan, I went about making a quick and dirty version of this device.
I got some 16ft 2x6's and chopped up some scrape 2x4s from the wood shop at school to make the elevator shaft, then I secured some pulleys to a steel plate on the top. Then I realized that I needed some kind of guide to keep the elevator car from popping out of the front, so I ripped some more scrap wood into 1" strips and screwed them onto the front. Then I went about making the elevator "car" out of scrap wood and scrap steel. I worked until about three in the morning on this thing. Then I got up at six in the morning to finish it. By the time I left to meet everyone to raise the roof, I had a functioning lift, but no base for it. I figured that I could enlist some help and finish it on site.
As it turned out, the amount I finished was exactly what we needed. I mentioned earlier that Blake saved the day. I explained the lifting contraption to him, then showed him what I had built, he laughed and said "that thing is as over built as these beams". He meant, I assume, that as with the roof, I made it far beefier then it needed to be. After a few minutes of thinking he told me that he thought it would be easier and safer to put the posts up first, then set my winching mechanism up right and raise the beam. I told him that I trusted his judgment far more then my own.
So we started.
 Blake taught us how to get the posts in place and secured with braces.
Then he instructed us to lift the first beam onto some scrap 6x6's which were both about four feet tall. This was to take some of the work off of the lift.
 Once the beam was secured in place we went about setting up the lift.
 We got the lift into position, then tried to lift the beam with the "elevator car" that I had built. That did not work because it got bound up in the shaft, so we tossed aside my sleepless night and more intelligently tied the ropes directly to the beam.
 To my shock, it worked. The ropes that tied to the beam were looped over pulleys at the top of the lift, then tied on the other end to a cable winch. A ratcheting device that looked a lot like this:
I was able to just crank on the winch, and the beam went up in the air. It was kind of magical.
After we got the beam in the air, Blake and my father got up on ladders and shimmied the beam into place, then nailed it down with some gusset plates.

We used the same method for the rest of the posts and beams with great success until the very end. All of the beams are notches to fit over the posts and these notches are of varying depth due to the fact that the concrete piers are not level. For the first two beams the notches were at exactly the right depth for each post, but on the last one, the end post was a little short. The beam was floating about two inches above the post.
Blake looked at that, then said "get a rope". We were then instructed to hang on the rope to pull the end of the beam down, while blake draped himself over the top of it and my friend Micheal nailed it into place.
 It was a spectacle, but it worked. All of the posts and beams are in place. Now I just need to organize another little party to get the joists in the air.
Subscribe to:
Posts (Atom)
