Sunday, August 30, 2009

backwards update

Prior to the house raising I had not updated in a while and a lot of work happened. I am finally honestly, completely, done with the digging related to the foundation (I think I am going to have to dig up some more clay, but that is a story for a later post). The bale foundation trench is finished and the dry well is more then deep enough. The concrete piers have also been poured and set so there is no digging left!


What a glorious thing, to be done with something. All of the digging I did taught me a lot about planning. I've talked about this a few times, but it took me making the same mistake again and again to finally get it. I think that the most critical step to do right in a foundation is the lay out and marking of the site. If you are like me and you rush through that part you will pay for it again and again with all of the digging you have to redo. If I were starting this project over right now I would do a lot of things differently. First I would have some one help me mark out the site. Digging I can do on my own, but you need at least two sets of hands to mark out a site. You cannot hold both ends of a tape measure all by your lonesome. Next I would not do a single bit of digging, or marking until I had completely cleared my site of problems like fence posts, tree roots, ect. Once it was clear I would mark and dig ONLY the pier holes. If I were redoing this project I would not do anything with the bale foundation until I put up the roof framing. Right now One of the big obsticles I am dealing with in trying to figure out how to get my beam up in there air is the fact that I have a big gravel filled trench in the middle of my site.

A side note about tools related to the gravel. I discovered yet another situation where the right tool is really critical. To dig a hole with a shovel, you want a spade. It is shaped like a spade, all pointy on the end. To shovel gravel you do not want a spade, you will be miserable. You want a flat shovel. The first time I shoveled gravel I used a spade and it was difficult miserable work. I got a flat shovel and proceeded to unload four truck loads of gravel, and it wasn't even bad.

The house raising

Today I learned how not to raise a roof. It is a bad idea to attach a monster beam to the end of 12 foot posts then try to erect the thing by getting underneath and pushing. It is a really bad idea to put your close friends under there with you.


A house raising party lead to this revelation. I invited a bunch of people to come help me put up the roof framing. It was like a barn raising. I assumed that if I had enough man power I could do anything. Unfortunately I learned that I was missing a key ingredient found at a barn raising, experience. No one on the site had any experience working on a project of this scale, and it quite nearly lead to a disaster.

The wood for my frame is truly massive. I was worried about the roof being able to support the weight of the sod which is usually rated around 100 lbs/ft, so I may have gone over board. My posts are 6"x6"s, and my beams are 4"x12".

I think this picture conveys the size, but to try to but it into perspective, it took five people to move the beams and it was still a struggle. The things were really heavy. Because the beams were so heavy we decided that the safest way to lift them would be to attach the beam to the posts on the ground then to push the whole thing up right. It seemed like a good idea; it seemed safe. It turns out that it was neither. The team lifted the beam then started walking forward lifting the posts and once it got to about 45 degrees it started to become unsteady. The bottoms of the posts were slipping forward and the beam wanted to go down. I think that everyone panicked at the same moment and just baled, so it fell, and luckily no one was seriously hurt. A few people got scratches and bruises, but no one took a direct blow. We were incredibly lucky. This is were experience would have been useful. In hindsight it is clear that our methods were not sound. We basically made a big lever that was working against us. At the time though, it seemed like a very good, and pretty safe plan.

Since I have learned that the materials I am working with are potentially very dangerous, I've decided to consult some experts. I imagine that there is some machine that I can rent for relatively little money that will take the danger out of this project. I'm going to talk to my uncle, and some faculty at school and find out a safe way to get that massive beam up in the air, and in the mean time, I'll work on some aspects of the house that I can tackle with out endangering anyone.

On the up side, a lot of work was accomplished the day of the failed house raising. All of the wood I bought was rough cut and untreated, and the team got all of the posts and beams cut to length and painted with some sealant. We also got all of the brackets squared up and attached to the concrete piers, and I think the most impressive undertaking was the amount of brush cleared from the area in between my future house and the neighbor's shed. Since we escaped major injury, I would call the day on the whole, a success.

Wednesday, August 19, 2009

Piers

I definitely had more digging. I forgot about the piers. The wooden posts that hold up the frame are supported by concrete piers that go down below the frost line. I found some excellent instructions on concrete piers here.

So far I have marked out all of the piers, then I recruited a few of my friends to help me dig. We got everything done except one corner. This particular corner has been giving me trouble since day one. There is a metal post from the chain-link fence, a 4x4 post from the privacy fence, and a huge ivy root system all tangled together. Here is the trouble spot before the fences were taken down.: I've removed both of the fence panels, but the posts and root system is still stuck. The roots have grown around the concrete foundations for the posts. Since it is so tangled, I need to dig deep and cut the roots so I can get everything out.

I have one week and two days to get the piers poured and cured. The saturday after next I am having a house raising party to erect the frame. The wood will be delivered next tuesday, then I have a few days to prep everything.

Thursday, August 13, 2009

Still Digging

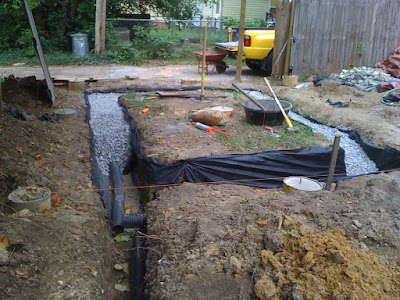
Hopefully today was the last day of trench digging. After the original dig I thought that I would only have a couple of hours of clean up, but getting the trenches to the right dimentions was a huge undertaking. First I needed to widen the trench by about six inches all the way around. I had made the trench the exact width of the concrete support beam that will hold up the bales, and I needed some extra room on the out side. After that I needed to adjust the depth so that water would flow out of the trench and into the dry well. Here is the trench, the dry well is in the foreground.
Below is a water flow diagram. The floors of each part of the trench are angled so that water will run down hill in to the dry well.

When the water is in the dry well, which is just a big hole that will be covered in landscaping fabric then filled with rocks, it will slowly be absorbed into the surrounding ground.

Thursday, August 6, 2009

measure twice, dig once

I finished the foundation trench today. it is about 2 ft deep, 1.5 ft wide, 15 ft on the long side, and 10 ft on the short side.


It was a good day to work because it was cloudy, and then rainy. I would much rather do hard work in summer rain then summer sun. Unfortunately I had to dig the front trench twice. When I marked the site originially I had it in my head that my size limit was 200 sq ft, and that my plans called for the long side to be 15ft arbitrarily. 15 ft seemed a little small so I uped it to 17 ft. Of course, my actual size limit is 150 sq ft, (this is the maximum size you can build a structure in the city of richmond and not have a permit) and my short side is 10 ft, so I had to move my front trench back 2 ft. Moving the trench flet like it went really quickly, maybe I was just in the grove and the temperature was nice, or maybe I had gotten better at the digging, probably a combination of the two.

Wednesday, August 5, 2009

How to dig a hole

Today I excavated half of my foundation trench, and I had some revelations about digging. For one thing, I've had the wrong idea about shovels. I always thought that a shovel was a perfect digging tool, but digging a hole, especially a big one, with just a shovel, is misery. Shovels are good for scooping and moving loose materials, and terrible for digging into compacted soil. In my opinion, you need two tools to dig a hole without breaking your back. You do need a shovel, but you also need a pick axe.

I started my foundation digging today with just a shovel and it was terrible. To get the shovel into the ground you have to use a lot of muscle, you thrust the thing into the ground, and then you have to stomp on it to get it properly wedged in. It is a lot of work. With a pick axe you lift it up and then pretty much let gravity do it's thing. It is a pointed weight on the end of a lever, a prefect design for breaking up earth. The energy input is minimal compared to the gain. With a shovel there are no mechanics increasing the energy you put it. You just have to work hard.

Once I figured out the digging secret, the work went pretty quickly. I would take a few swings with the pick axe to break up an area then shovel out the dirt. It took about five hours to dig half the foundation trench.